Posted on Leave a comment

5 Easy Maintenance Tasks You Need to Perform On Your Cricut!

5 Easy Maintenance Tasks You Need to Perform On Your Cricut!

Look, these Cricut maintenance tasks are not difficult nor time-consuming, but they are vital to keeping your machine in tip-top shape. Cause, you want it to perform as well as it possibly can every time you use it. Right?
Before we get into the steps, make sure you pin this to your Pinterest so you can reference it. You can do that by clicking here or the red PinIt button.

So, here is what you need to do:


#1 – Clean your machine.
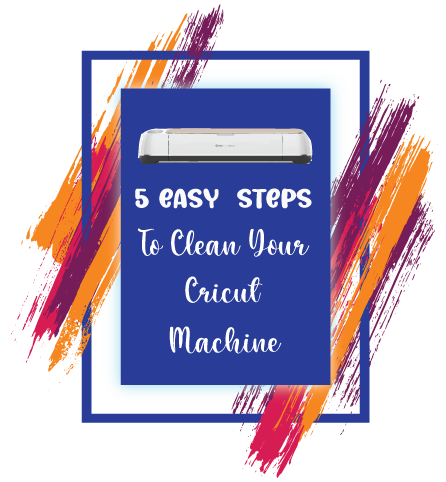
This is such a VITAL step. One that I take seriously. I clean my machine to some degree every day. This is so important that we have actually put together an in-depth blog post and video for you so you can follow along and learn all the steps you should take to keep your machine clean.
If you’ve had your machine for 6 months or less, you probably don’t need to panic yet, but start following the steps. Now, if you’ve had it longer than that, you need to get on the ball! You need to be sure that everything is clean and that there is no debris in your machine that may be interfering in getting perfect cuts and results.
I deep clean my machine at the least, once a week, but I also clean it if I use it on a large project.


#2 – Update your software/firmware.
I can’t tell you the times I see people complaining about the performance of Cricut Design Space. Yes, sometimes there are issues stemming from Design Space itself, but all too often it’s because they haven’t updated their software.
If Cricut has done updates on their end and you haven’t installed those updates on your end, you could encounter issues. If you close Design Space when you are finished using it, when open the program, it will alert you that there is a new update to be installed. This makes it easy to stay current all the time!
I know sometimes, we get busy crafting, and we just leave Design Space open, but when we do, we can miss those updates. Just stay aware and periodically take a look you might just need to update. Just go to their home page on Cricut Design Space.
In the top left corner, you’ll see three lines (next to where it says Home). Click those to open the dropdown menu. On that menu, simply click Update Firmware and follow their instructions from there. It will check to see if you have the latest update and if not, it will prompt you through the process.


#3 – Calibrate your machine.
I know the word calibrate may sound intimidating to some, but it really isn’t that difficult of a task. There are 3 things you need to calibrate on your machine. They are: Print then Cut, knife blade, and rotary blade. With a Cricut Explore, you can only calibrate for Print then Cut.
By calibrating, you are helping to ensure that your machine cuts flawlessly every time. If you are making a Print then Cut project, using the knife blade or rotary blade, you need to calibrate before even getting started.
If you haven’t done this and you find that your cuts aren’t precise, this is likely the issue. So, head to Cricut Design Space, and on the home page, click on those 3 lines in the top left corner (just as we did for updating the firmware) to open that dropdown menu again.
Choose Calibrate. If you’re using a Cricut Maker, it will then provide you with the 3 different options to choose from: Print then Cut, Knife Blade, and Rotary Blade. Follow the steps on your screen.

We have a video tutorial on how to calibrate your machine here.


#4 – Delete old projects.
When you are a very busy crafter and you have created tons of Cricut craft projects, you might start finding that your Design Space project library feels a little cluttered. If this is the case for you, you can choose to delete your old projects.
Go to Cricut Design Space and from the home page, you can see My Projects. Click on View All. Choose the project you would like to delete and click on the 3 dots. From there you can choose to Edit the Project Details, Save for Offline, or Delete the Project. It will then ask you to confirm that you want to delete it. Click Yes and it’s gone!
There are also ways that you can organize your projects in Design Space to help keep things in order. Learn to Organize and I’ll walk you through how to do that.


#5 – Clean your mat.
Always be sure to clean your Cricut mats! You can get so much more use out of them and have much better results with your craft projects by using clean mats.
Our favorite way to clean mats is by using baby wipes, but we have an amazing tutorial on 3 different ways to clean your cutting mats that you are going to want to check out.


You have invested good money into your Cricut machine. Make sure you maintain it and get the most out of it for years to come!

 

Posted on Leave a comment

How To Download & Install Fonts On Windows Computer

We use fonts in designs because they are what sets your project, graphic, image. Webpage, etc apart from others and allows you to express your own creativity and style. So why would we just settle for the default fonts that came preinstalled on our computers, which are universal? 

So, I showed you where you can find free fonts and explained the difference between free, commercial use, personal use and demo in the license regard. Now I am going to show you how to install the fonts that you found and ways that you can keep fonts that you like and not have to install them until you want to use them. Fonts can consume a lot of space on our computers. So, to help save on space, you may not want to install all the fonts you’ve downloaded, maybe just the ones you are using in a project. Fonts can be uninstalled just as an app from your computer when you are no longer working with that font if it is being used project specific.  

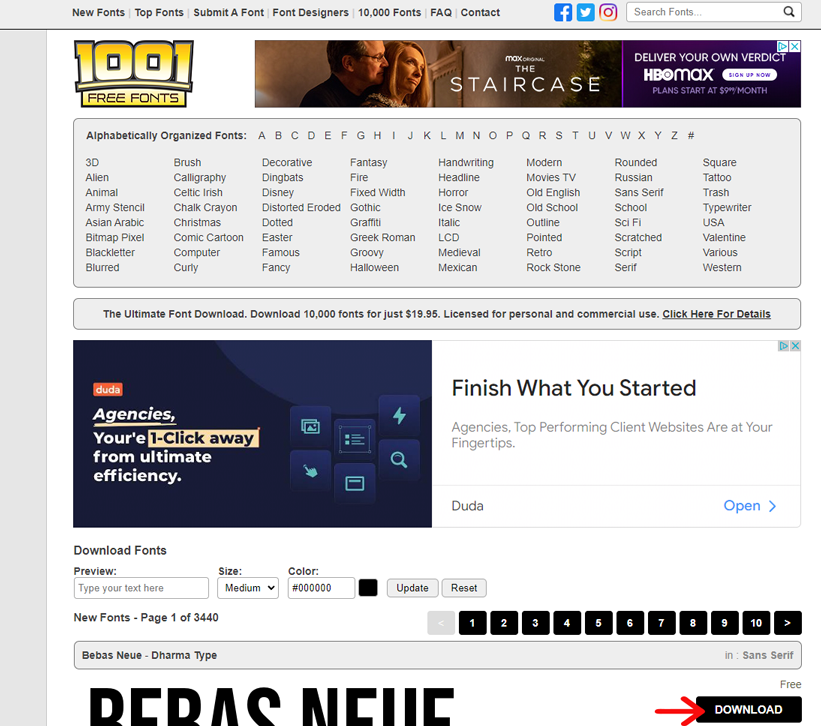
So, for this tutorial, I am going to use 1001freefonts.com 

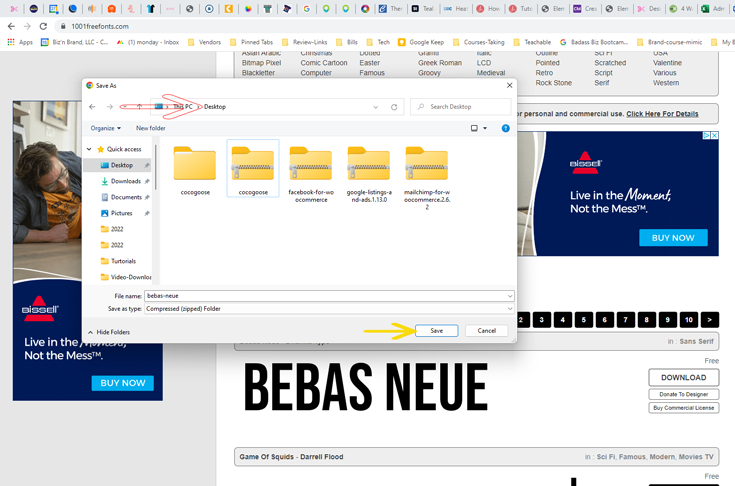
You find the font you want, click the download button on the right of the font. Your window system box will open and this is what you will see 

In this area, pay attention to where it says the file will be saved to on your computer (RED ARROW). I usually save things to my dropbox, so they aren’t being stored on my hard drive, but for this tutorial, I am going to save this on my Desktop and then click save (yellow arrow). 

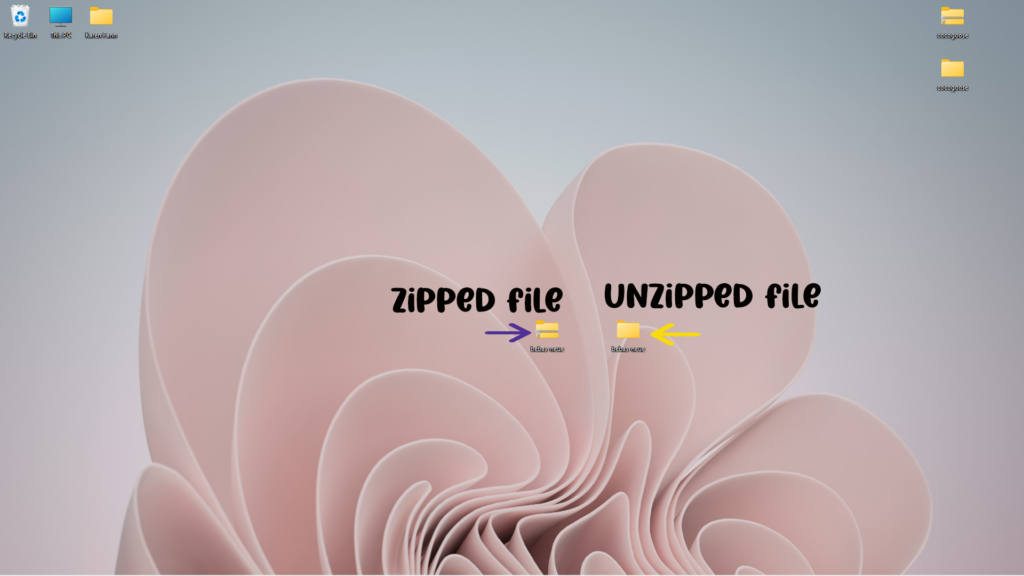
Now, once that is saved to your desktop, you can close the browser or minimize it and go to your desktop. Fonts are always in a zip file, so you will need to extract that file before you can install the font. 

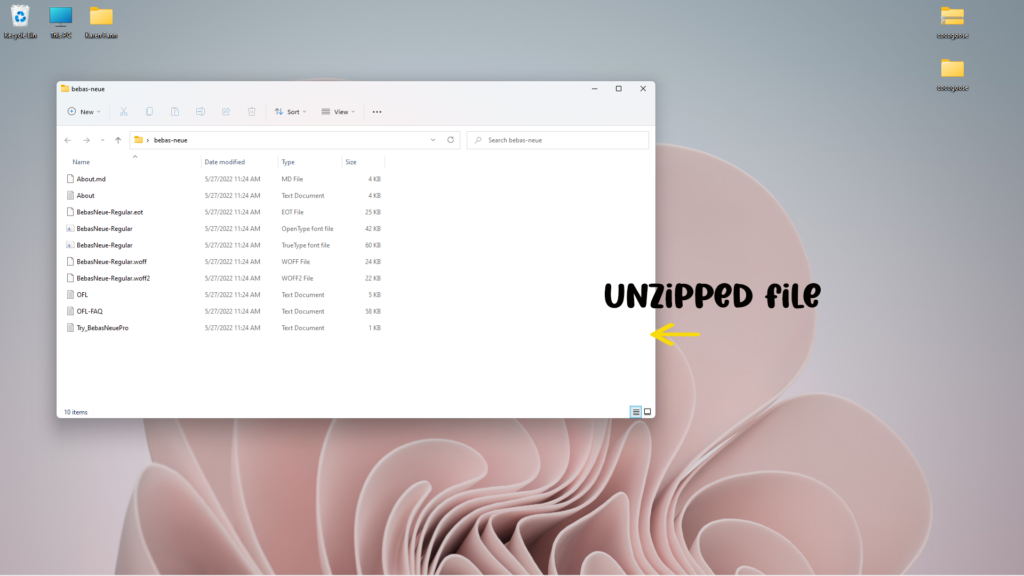
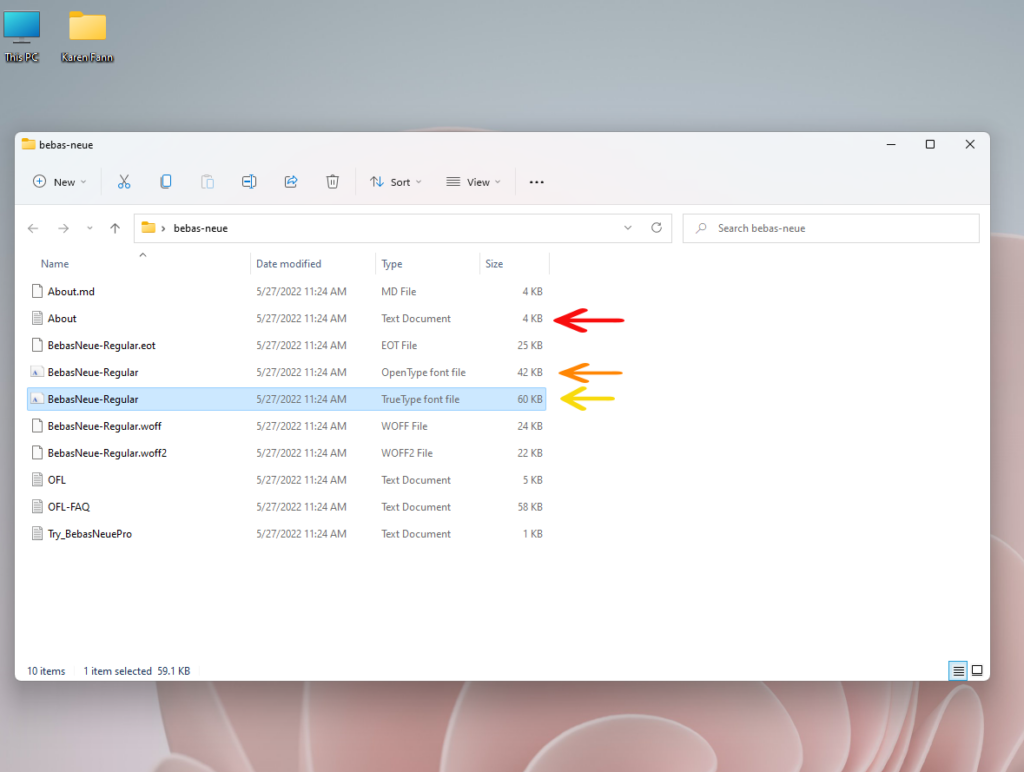
To extract, you will right click using your mouse on the file you just saved to your desktop and click extract in the menu that opens. This will create a file on your desktop with the same name as the zip file that you downloaded. Open the newly extracted folder and you will see the variations of the font that you just downloaded which will look like the below image. 

Choose the OpenFace Type, or the TrueType Font. The About Text document (Red arrow) will give you information about the author of the font and the licenses that comes with this download. Make sure you read that and know the legal way in which you are allowed to use this font. 

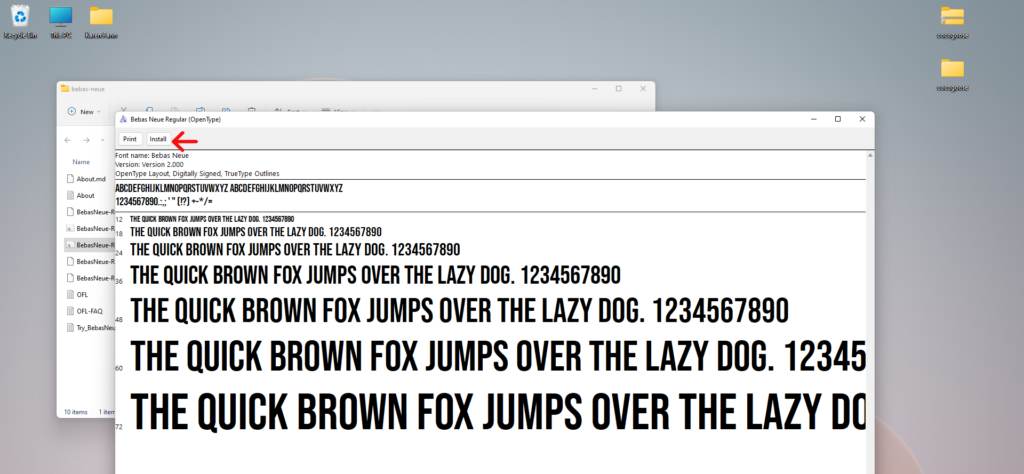
When you double click that file another window will open and will look like this: 

Click install (red arrow) and you will see the install dialog open and install the font. Once the install is complete, you can close all of the windows and return to the program that you are using to create your project and use this newly installed font!  Check out the video I did to walk you through the process of downloading, extracting and then installing your fonts.  See you over in the video!
All my best,
Karen
Flippin Fine Vinyl
Posted on Leave a comment

How To Find Free Fonts.

The world of fonts can be confusing and overwhelming to say the least. There are tons and tons of websites to get fonts. Some fonts are not free, you must pay to use them. So, I put together this tutorial on how to find free fonts to use on your projects. I’ll also record a video of how to use each site but wanted to have this document for you to reference anytime you need it. In the video, I will also show you how to download and install a font from each of the sites listed in this article.

First, lets talk FREE fonts! I don’t know about you, but I love the word FREE when it comes to creating projects. I get my fonts from many places (yes, I even pay for some fonts), but the ones I feel offer a better selection of FREE fonts are:

  1. DaFont: https://www.dafont.com/
  2. 1001 Free Fonts: https://www.1001freefonts.com/
  3. Font Bundles: https://fontbundles.net/free-fonts (commercial use allowed)

There is a right way and wrong way to pair fonts in designs but that is a whole nother tutorial (which I will be doing), but right now, I want to show you where you can get FREE fonts and how to download and install them on your computer.

Dafont:

There is a disclaimer at the bottom that reads: (orange arrow) “The fonts presented on this website are their authors’ property, and are either freeware, shareware, demo versions or public domain. The license mentioned above the download button is just an indication. Please look at the readme-files in the archives or check the indicated author’s website for details and contact him/her if in doubt. If no author/license is indicated that’s because we don’t have information, that doesn’t mean it’s free.”

What the disclaimer means is that the fonts on their website, do not belong to them, but instead to the person that created them and uploaded them. They set the type of licenses they are willing to give. Some are 100% free and can be used for commercial use, others are personal use and then there are some that you must purchase to use.  I know you will find 100% free fonts on this site that will work with just about any project.


You can find fonts by several ways on Dafont’s website also, which are:

  • Search by name; (yellow arrow): If you know the name of the font you are looking for, just type that in the search bar, hit enter (or click the search button) and find your font.
  • Alphabetically: (green arrow) You can use the alphabets below the search box to browse fonts as well.
  • Menu Search: (purple arrow) You can view fonts by authors names, newest fonts, themes and even has tools you can use to view all the fonts that are on your system as well as other resources to find fonts.
  • Descriptive Search: (blue arrow) This allows you to search fonts in certain categories such as Bold, decorative, Cartoon, etc.
  •  

The one drawback on Dafont’s site is that to see what your text will look like in a particular font; you have to click the font name and on the font page there is a box to type your text. This is a bit more time consuming, but as a professional designer, I’ll tell you… as your get into this, you will find you spend hours looking for fonts to use in your projects.

1001 Free Fonts:

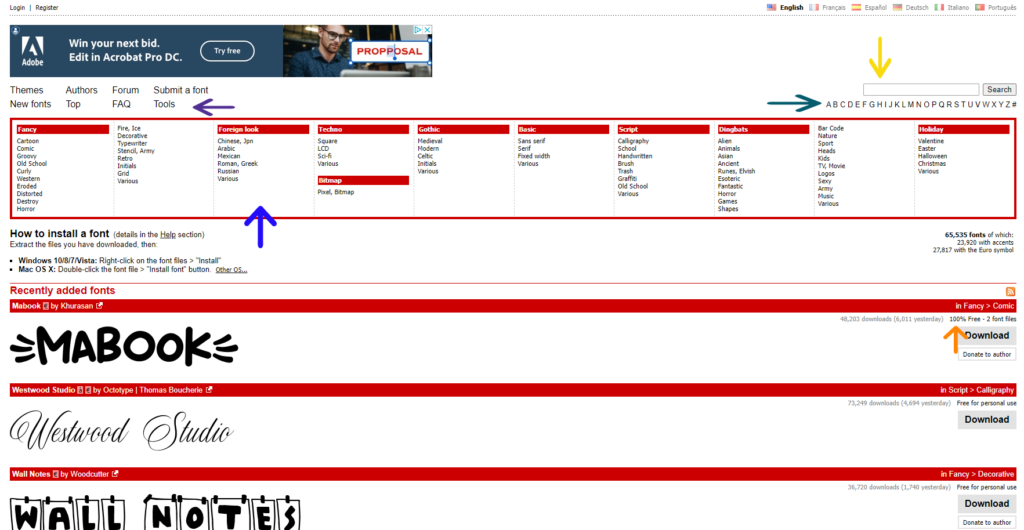
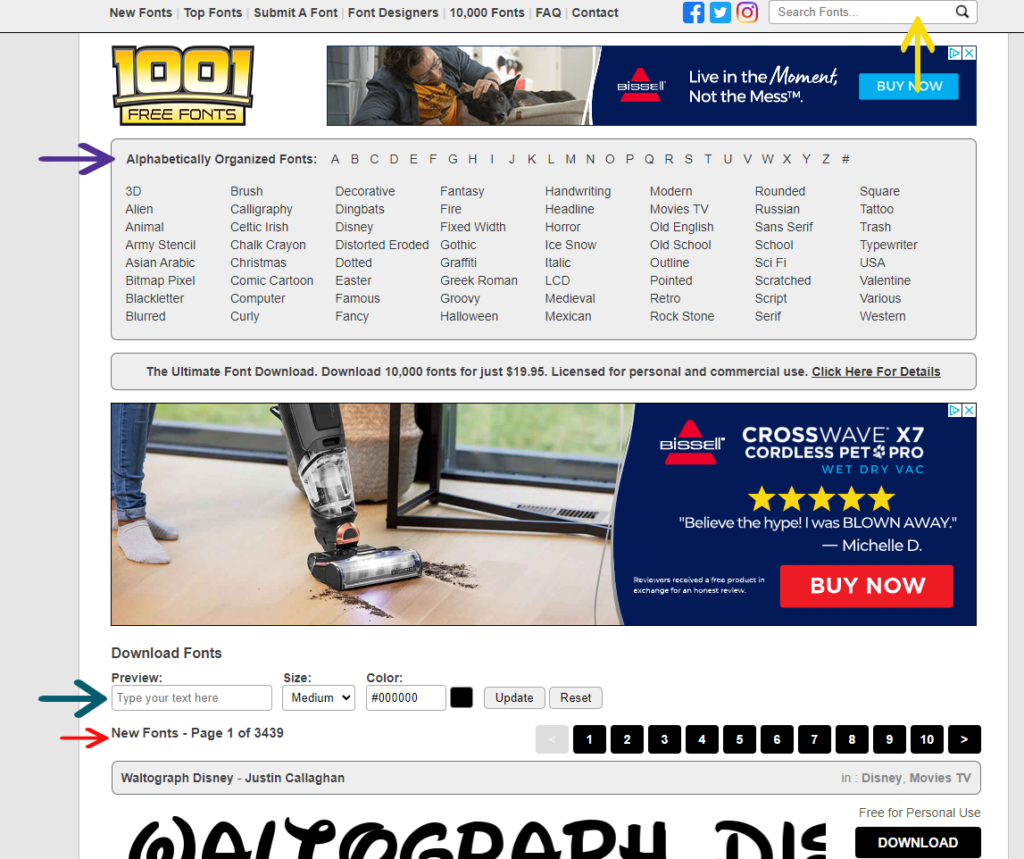
I think this is one cool site to find fonts. At 1001 Free Fonts, you can search for fonts by their name, you can scroll through the site to find the one you like, or you can use the Alphabetically Organized Fonts section to look for fonts that catch your eye.

  • Search by name of font: (Yellow arrow at top) Just type in the name of the font and see what comes up. Not all fonts you see on the internet are on this site, these are fonts presented by 1001 Free Fonts.
  • Browse The New Fonts: (Red arrow) Just scroll and use the advancement arrows at the top and bottom of the page to go to next page. As of this tutorial, there are 3,439 new fonts on 1001 Free Fonts and that is just the newest fonts added to their massive collection of free fonts.
  • Search Alphabetically: (Green arrow) You can use this to search aby A, B, C, etc or use the descriptive names below in the grey box.
  • Search fonts using text: (Purple arrow) In the box, type the word or words you are working with, this will allow you to see what your text will look like with that font. Not all fonts on this site have that ability, but most of them do. It’s a great way to know if that will work with your project.

Font Bundles

As with all font websites, some fonts are free and some cost. There isn’t anything that can be done about that. So, make sure you pay attention as you are looking and considering fonts. Each will say if Free, Demo, personal or commercial. That is up to the designer of the font.

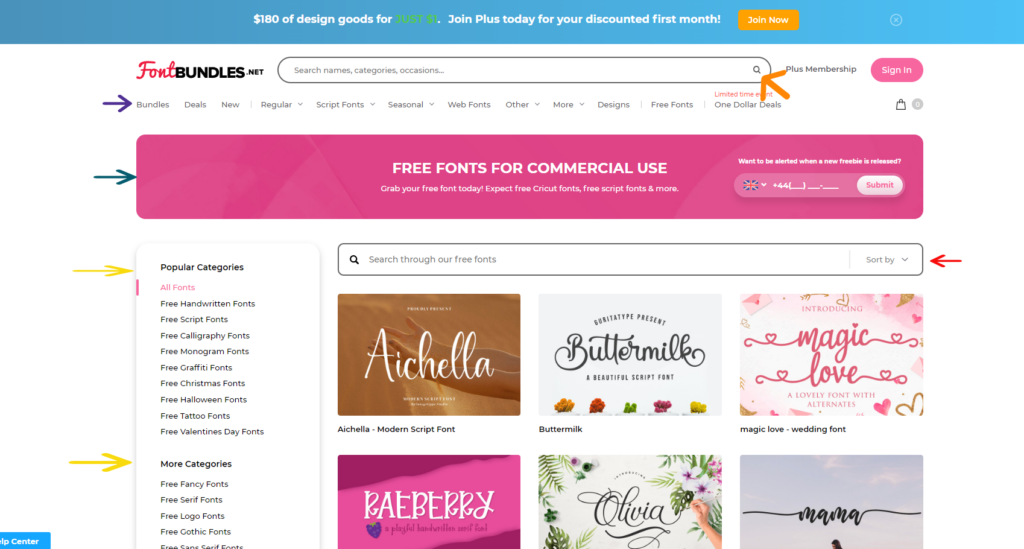
 I really like the ways you can search Font Bundles website. There seems to be a bit more “search options” such as name, occasion, or category.

  • Search Bar: (orange arrow) This allows you to search for fonts by name of the font, category, such as bold, italic, cartoon, etc. Then just look through to see what you like.
  • Website Top menu: (purple arrow) Predetermined categories of fonts as they are on the site. This allows you to look for like Bundles, Script, Seasonal, etc.
  • Commercial Fonts: (green arrow) Not really sure why I put an arrow, cause it is the pink box at the top of the site (hehe) These are fonts that are free for commercial use, which means you can use those fonts on projects that you sell.
  • Side Menu: (yellow arrows) This menu has categories listed that sort the fonts for you, there are many to choose from and I will show this to you in the video.
  • Search Free Fonts: (red arrow) This allows you to search the site for free fonts and you can do so by using the name of the font, a descriptive words, such as Bold, Italic, Cartoon, Dingbats, etc.

As you can see just from the 3 sites of fonts listed, there are millions of options and millions of free fonts. Yes, you may see the same font on all 3 sites, but each have a lot of options and is a great way to create beautiful designs and projects.

Without fonts, everything would look the same.

Have fun looking at all the different fonts and above all have fun crafting new and exciting projects.

 I look forward to seeing all your projects using all the fonts you find! Please share them in the Facebook group. The Facebook group is a great way to get help, feedback on projects, materials, etc. It’s a safe place to post your projects for feedback and help from others.

Here is the youtube video for the tutorial